
Minecraft
PC May 2024
-
 Multiple Version Support
-
 Mod Required
-
 Mod Compatibility: Good
-
 Built-in Support
-
 Automatic Setup: Full
-
 Auto Uninstaller
-
How to Setup Singleplayer Minecraft Crowd Control
-
How to Setup Multiplayer Minecraft Crowd Control
Guide
Minecraft Server
You can follow the general setup guide & FAQ above for extra help with the Twitch Extension, the Crowd Control Desktop Client and other options.
If you have any questions or need help with this setup, please head over to our discord for additional support!
Automatic Setup
We suggest the following setup if you want to play the latest version of Minecraft: Java Edition alone on a new world with just the Crowd Control mod. For anything else, check out our Advanced Setup!
Our support for Minecraft is based on different server frameworks. These allow for more flexibility while keeping your launcher setup clean. Find more info below.
- In the Crowd Control app, select Minecraft from the Game Library or Live tab
- From the CC app, press “Configure Minecraft”
- For playing alone, select the “Local” server type.
For playing with friends, consult the Advanced Setup guide. - Select Framework (we suggest Fabric)
- From the CC app, press “Click to install”.
- From the CC app, press “Launch Server”.
- Now that your server is running, open Minecraft using your Minecraft Launcher and select Multiplayer.
- Feel free to use a launcher of your choosing such as Prism Launcher, Modrinth, CurseForge, or PC Game Pass.
- Click Add Server, and use Server Address
127.0.0.1. Then, join your server. - When your load in, you will be prompted to “Click here”. Follow the on screen instructions.
- From your browser, login to your Crowd Control account.
- After logging in, your session will automatically Start!
Advanced Setup / Multiplayer
If you want to play on an existing singleplayer world, a dedicated multiplayer server, a pre-1.21.2 version, or on a modpack, then please read the Advanced Setup Wizard!
Minecraft Frameworks
While we may have supported other frameworks in the past, only these are kept up to date! See the Advanced Setup for legacy versions.
Fabric
This version is generally updated to new releases the fastest. It also supports the most features, though you will need to install the mod on your client to utilize them.
Minecraft Version: Supports 1.21.5 trough 26.2, old versions available for 1.19.2+
Config: config\crowdcontrol.conf
https://fabricmc.net/
NeoForge
This version is very similar to the Fabric version, though more experimental. To use all its features, you will need to install the mod on your client.
Minecraft Version: Supports 1.21.5 through 26.2, old versions available for 1.19.2+
Config: config\crowdcontrol.conf
https://neoforged.net/
Paper
This version features the best performance and stability but is updated to new releases slower than Fabric.
Minecraft Version: Supports 1.21.2 through 26.2, old versions available for 1.19.4+
Config: plugins\CrowdControl\config.yml
https://papermc.io/
Tips
These tips should work for any of the above supported server frameworks! (unless noted otherwise)
Effect Statuses
This game pack uses the Effect Status system to dynamically disable or hide effects from your viewers. This helps ensure that your viewers can only purchase effects that work with your setup. Listed below are some reasons that an effect may be unavailable.
- You aren’t using “global” mode – Effects that apply to all players on a server are disabled or nerfed when you haven’t enabled the “global” config setting. Alternatively, if you want to enable these effects without necessarily sharing effects directly with other players, you can add your username to the “hosts” config setting.
- Examples: Set Time to Day, Clear Weather, Hard Mode, Freeze Time, Teleport Entities to Players (nerfed)
- You don’t have the client mod installed – The mod can optionally be installed on your Minecraft client to enable some extra effects.
- Examples: Screen Effects (legacy only), Language Shuffle (requires an extra Fabric-only mod)
- The effect state is already active – It can’t be used because the effect is a “toggle effect” and the toggle is already on.
- Examples: Peaceful/Easy/Normal/Hard Mode, Keep Inventory On/Off
- You don’t have enough players – Effects can require that you have 2+ online in-game players. They either must be linked to the same account or you must have “global” mode enabled.
- Examples: Swap Players, Unite Players
Reset World
If you’ve played before and wish to start a new world, then you can delete the “world” folders on your server, which will generate a new seed when it next loads.
- Make sure your Minecraft Server is not running.
- From the Crowd Control desktop app, head to Config > Game Paths. Find Minecraft, and click the folder icon.
- From Windows Explorer, open the folder for the framework you are playing.
- Delete all “world” folders, including “world_nether” and “world_the_end”
- Relaunch from the Crowd Control desktop app to regenerate a new world!
Global Effects
If you’re looking for effects to happen to all players, you will need to edit the config file corresponding to you Minecraft framework. You can see each config file above under each of the supported frameworks. For now we’ll use Paper as an example.
Config: plugins\CrowdControl\config.yml
This is as easy as opening that file in your editor of choice and adding the line:global: true
Save the file, and reload your server and now any effects sent to a player will be repeated on others.
Server Commands / Cheats
When using commands on the server, you will want to exclude any / from your commands. You will also want to run these commands from the black server window that opens when you “Launch Server”. You can find some useful basic commands here. The example pictured below shows how you can add a player as an operator, allowing them to run commands in-game.

Downgrading
When a new Minecraft update releases, it can take some time for us to bring support to the new version as we wait for some third-parties to update their tools. If you get an “Incompatible version” or “Outdated server! I’m still on X.Y.Z” error message, then follow these steps to downgrade your client:
- In the Minecraft Launcher, ensure you have selected Minecraft: Java Edition on the left, then click Installations
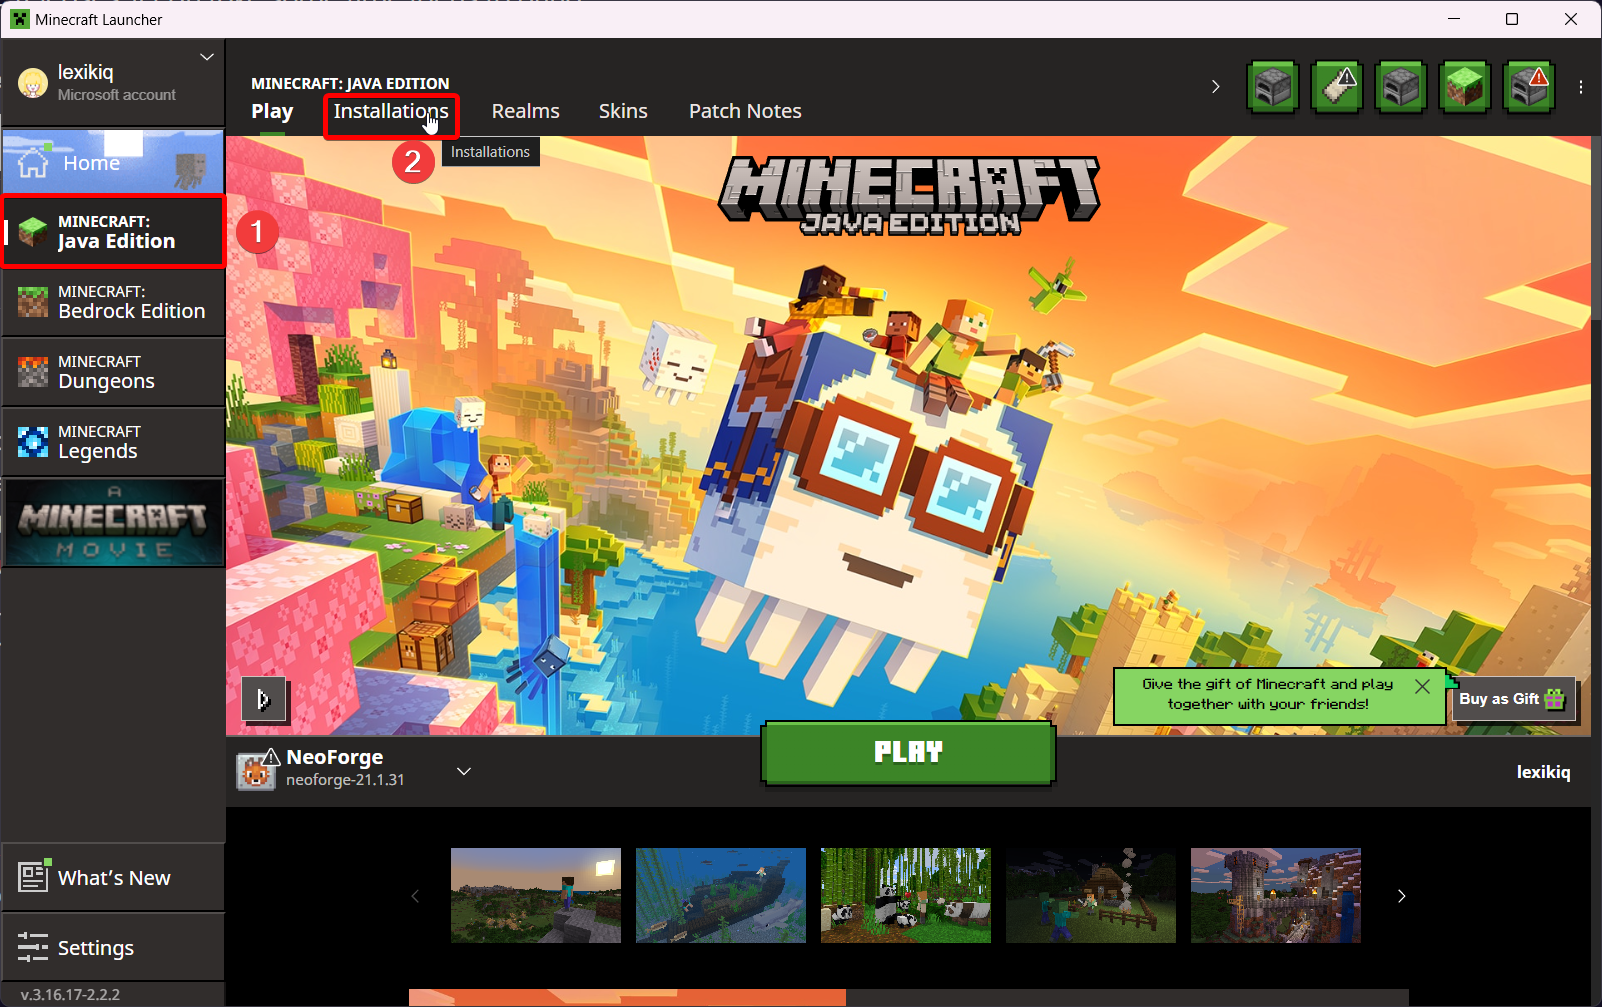
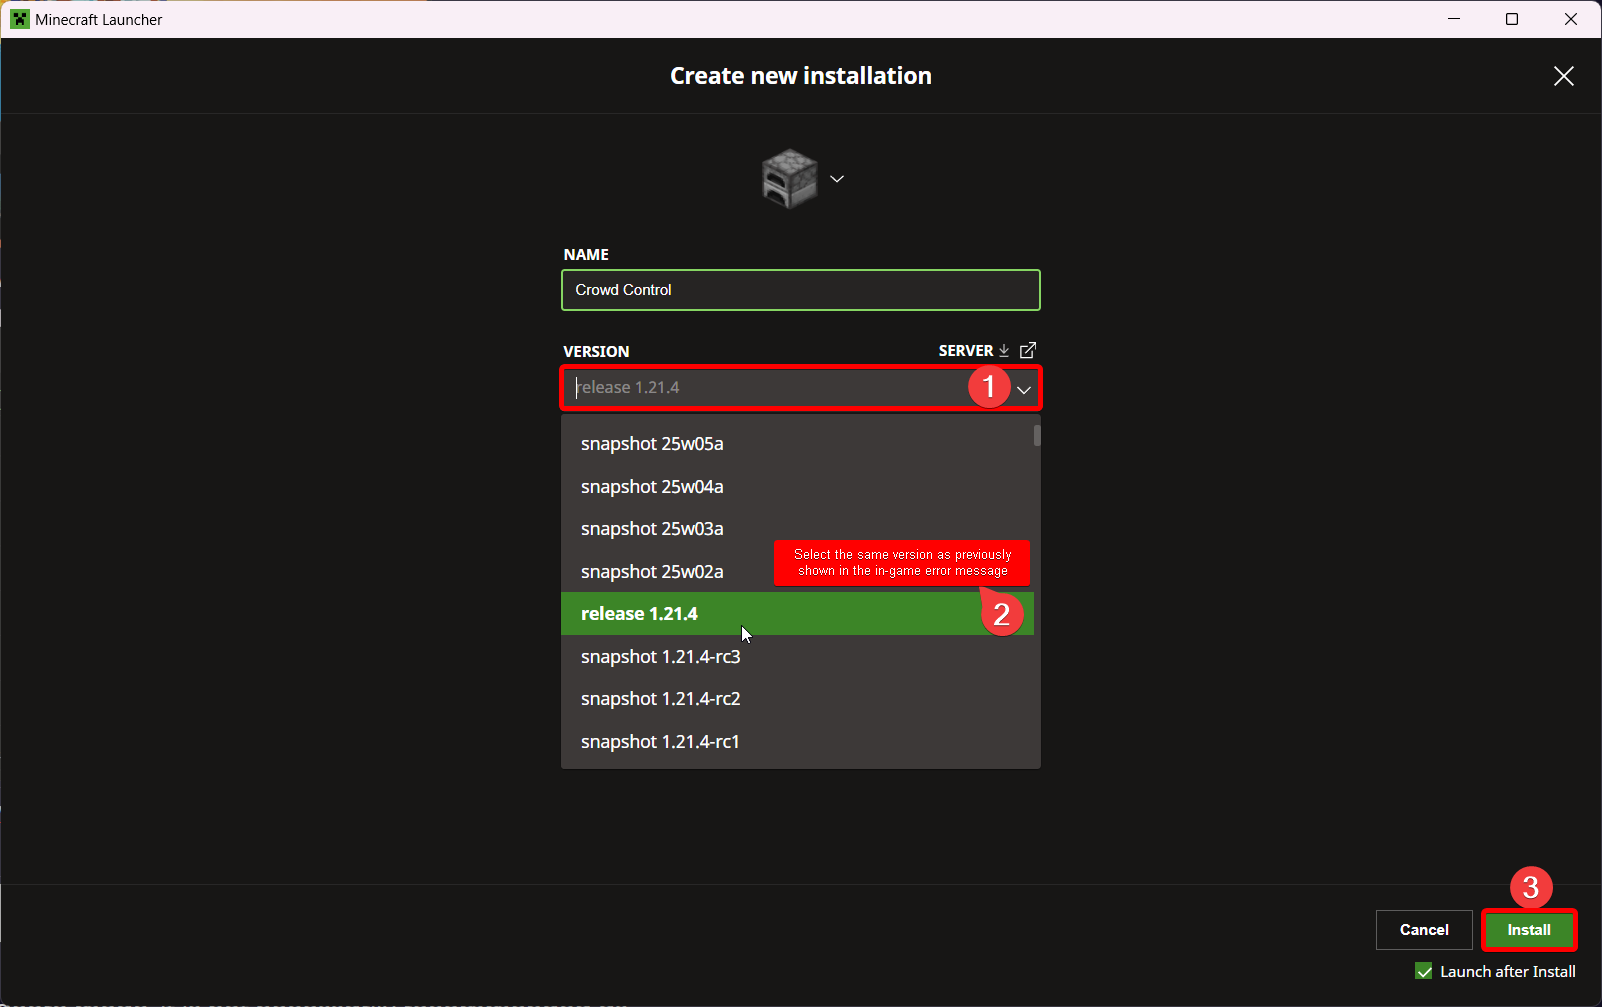
- In the new tab, select New Installation

- Open the Version dropdown and select the version that was named on the “Outdated server” error screen, then click Install
- If the game does not launch automatically, then you should be able to find your new profile near the bottom of your Installations list and click Play.
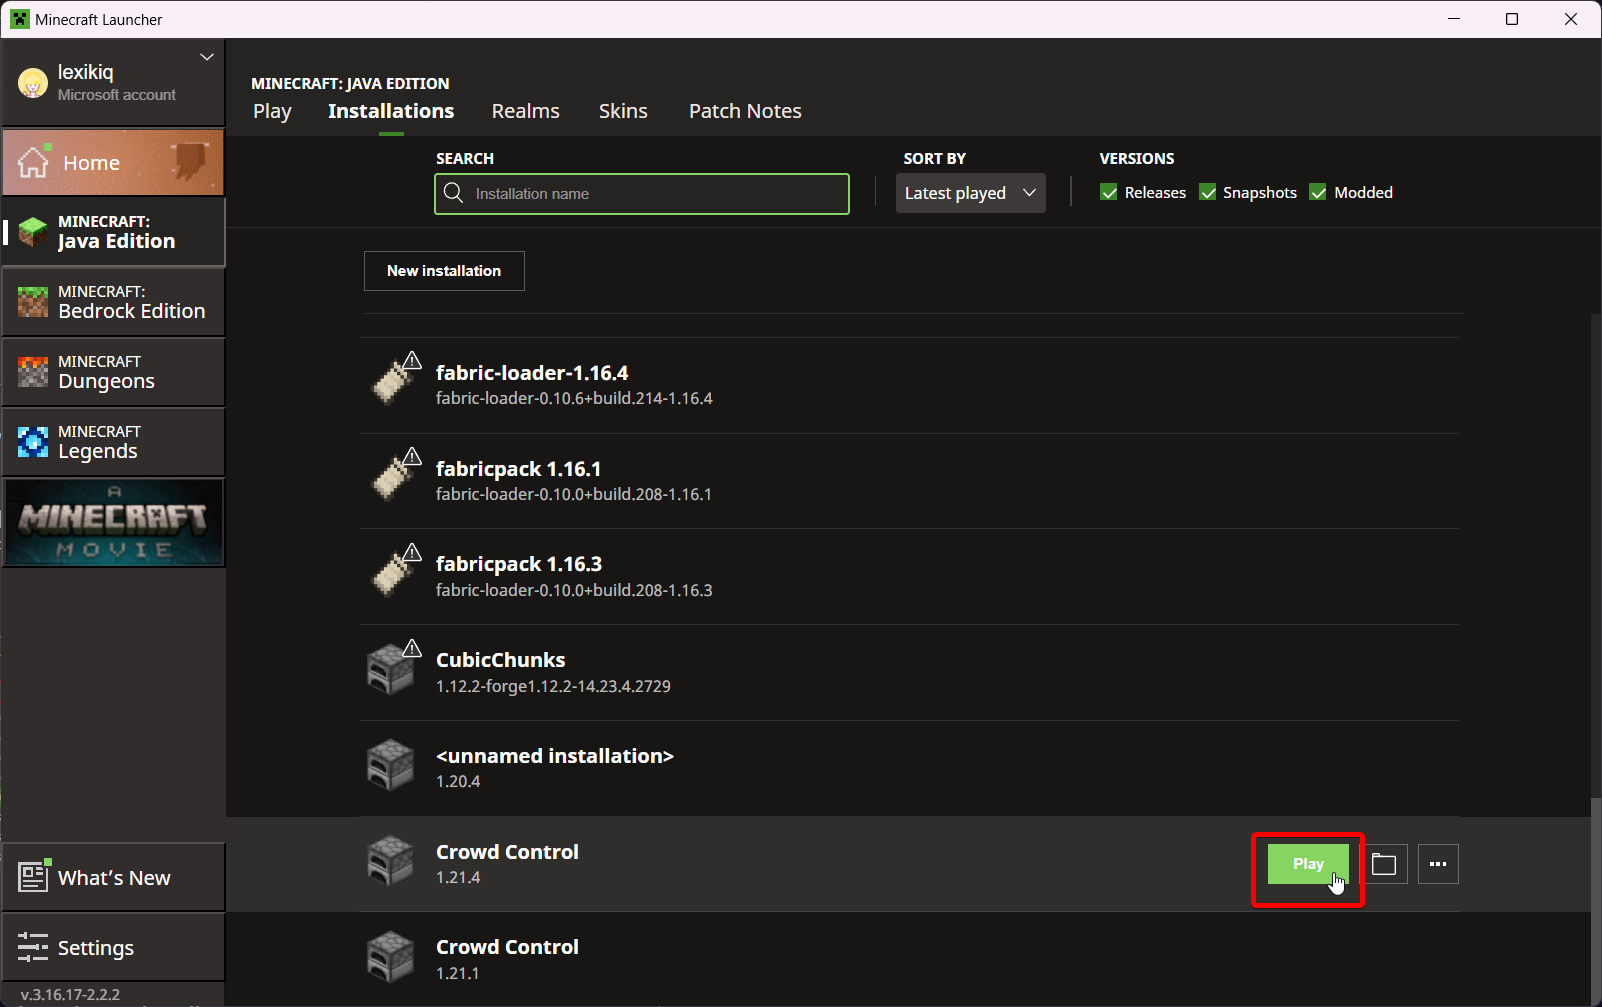 From this tab, you can also find and switch back to the Latest release near the top of the list once our mod updates.
Bedrock Edition
While not officially supported, some users have seen success joining the modded server from Bedrock Edition clients after installing Geyser.
Hardcore Mode
Although you can enable hardcore mode, it is not necessarily recommended as you will have to restart your session upon every death, which can be quite often if your chat is particularly chaotic. We instead recommend using the Paper framework with our Fahare plugin which generates a new world upon death without closing the server. You can install the plugin by downloading it into the Paper/plugins folder, similarly to how you might reset your world using the steps above.
“Failed to bind to port”
If you’re unable to connect to the automatically setup server in-game and see this error message in the console logs, it means another app on your PC is using Minecraft’s port. This could just mean that the server was accidentally opened twice, if so closing them all out and reopening should help. If you’re using VTube Studio, make sure to launch the server before you open VTS.
Credits
Thanks to Lexi for being our resident Minecraft expert and continually maintaining and improving this mod! You can find the full project, including tips and additional setup details here.